Saturday, April 30, 2011

oh so dandy...

The May kit over at Jenni Bowlin is a beautiful mix of oranges and yellows, grays and blues, so elegant and colorful at the same time! I always love the embellishments she manages to find, it's always fun to try something new and the mix is so eclectic and fun! I made a few cards with the main kit so far...
On this first card, I used one of the journaling cards folded in half for my base. (There were 2 smaller ones with a perforation in the center, so I just folded it to make the card base.) Added some Pink Paislee die cuts with pop dots. Everything here is from the main kit, except the saying, which I stamped with a Papertrey Ink stamp from their Sending You set, and the postmark that I stamped with their Postmarks set!
The Studio Calico stickers were beautiful, I am so into yellow right now. I grabbed one of them and made a "ribbon" with it and used the metal circle for the top of the ribbon...
"Congratulations" is stamped with Papertrey Ink's Mat Stack 2 Collection stamp set. I used some little pins from my stash to pop up some punched stars. (You could add a little earring back on the pins if you didn't want them to poke the recipient!) I like the flair that the stars add!
On the last card, I used a vellum envelope from the kit and added a piece of gray patterned paper inside and another Studio Calico sticker on the front stamped with a stamp from Papertrey Ink's Birthday Basics set.
The cute little clear butterflies were in the kit and they had a small hole in them, so I put some sewing pins through them and tucked the pins under the sticker. Love the citrus colors on this one!

You can find the May kits here!
Thanks for visiting today - have a good one,

Wednesday, April 27, 2011

texture, texture, texture...

Today I have a little mini album to share made with canvas pages by Maya Road - they are a great medium for inking, painting, stamping and stitching (I did all 4)!
I used 2 of the heart pages and 2 of the longer rectangular pieces for the mini album, but I think I'm going to add more pages and more pics that I took of Kati one fall. Of course, you could change out the colors and use any type of photos with these canvas pieces! I also used a smaller rectangle canvas piece and folded it in half, then stitched it to the front of the album.
I always have fun creating little peekaboo windows or finds in a mini album, something unexpected. I stamped on the cover with Papertrey Ink's Button Boutique stamp set, one of my favorite sets that can be used for so many things! I made some hearts with Papertrey Ink's felt. (They are hand cut.)
Some inside pictures...
I thought the natural outdoor photos went well with the natural look of the canvas!
Added a little sticker border by Basic Grey...

I still need to finish the journaling inside - still a work in progress...
Love these little resin flowers by Maya Road!

Glue Arts' Extreme Adhesive Squares work awesome for adhering all of the embellishments, such as the felt and chipboard. I love them so much and use them on everything!! On a sad note, this will be my last project with the Glue Arts blog. I felt lately that I had to let something go, but it doesn't have anything to do with their products. Their products are A-mazing, and I will continue to use them!! If you ever want to try out for their team, I would highly recommend it. Everyone at Glue Arts is very professional and supportive, they continue to get the best products donated for us to use, and they are just truly a great company all around!

I hope you'll keep the Glue Arts blog on your list, such great projects and giveaways there each day. Visit today for your chance to win some Maya Road products!
xo.

Tuesday, April 26, 2011

Happy belated Easter!

Another holiday over - phew! Now I know how much work my mom put into all of the holidays, she was such a great mom to make every holiday special for us! (And still is, she still sends something for each holiday!) I posted a few pictures over at Facebook of our Easter at Grandma Kathy's house on the Hudson River if you'd like to check them out. :)


Thursday, April 21, 2011

a little bunny told me...

Easter is almost here and I couldn't resist doing a bunny page! This layout actually started out as a card (with the postage E), then I decided to scrap these pictures I just took of Kati the other day when she came home from school. Her teacher is so fabulous, she always does fun things for the holidays at school, and she painted their faces herself for their Easter party! Kati looked so cute when she came home on Friday.
She made a list for what she wants for Easter in a letter to the Easter bunny, so I scanned it, shrunk it down, and put the list inside the card, using the card as hidden journaling. She is 5 and is learning to sound words out in her journal writing at school! So proud of her!
We couldn't figure out what some of the words were. ha:) Here it is scanned and inside the card...

I used several of the Pink Paislee lines, including the Soiree line (the gray paper and twine), the Daily Junque line (pink graph and green tissue paper), an Artisan Element (on bunny tail - coated with glitter), a Sweetness clear card (polkadots behind E) and some Artisan Tape (black and white tapes) - all by Pink Paislee. I cut the little bunnies and the postage E out of the Cricut cartridge called Martha Stewarts Crafts - Seasonal Cake Art. I finally took the time to figure out my Cricut, and now I don't think I'll be able to create without it!! LOVE it!

Wednesday, April 20, 2011

2010 Anniversary Set *spoiler alert*

(For those of you getting the 2010 Anniversary set, you may want to wait on reading this post!)

Today the Papertrey Ink girls are showing you some projects made with the new 2010 Anniversary Stamp Set called Botanical Silhouettes! On the first one, I masked off the rest of the sentiment and just stamped "best" in Pure Poppy ink on a Pink Paislee paper. There is a stamp that said "my friend", and I broke that one up as well and just stamped "friend" on vellum, then added it to my card.
I used lots of Crate Paper - Restoration line here today on these. It was one of my favorite lines and I still have a lot of it left!
Best Friend card:
  • Stamps: Botanical Silhouettes
  • Ink: Pure Poppy, True Black
  • Paper: Crate Paper- Restoration, Pink Paislee Parisian (polkadot), vellum
  • Dies: none
  • Other: Crate Paper stickers, Pink Paislee Parisian ticket, circle punch, chipboard by Dear Lizzy – American Crafts, flower by Recollections – Michael’s
----------------------

I had SO much fun with this next card! I wish I could get better photos of it, because the technique is so pretty in person. I stamped the stems from the anniversary set sideways on white cardstock, then embossed them with white embossing powder. Next, I used my ink pads - Sweet Blush and Vintage Cream - and went to town with my Tim Holtz blending tool blending the ink over the embossed stems. I love how it turned out!


I cut 2 XL rickrack borders and cut them in half. I trimmed them with pinking shears and stitched them around the front to form a frame. A sentiment from the set was stamped over the stickers.
Best Wishes card:
  • Stamps: Botanical Silhouettes
  • Ink: Sweet Blush, Vintage Cream, StazOn (black), Versarmark for embossing
  • Paper: white cardstock
  • Dies: XL rick rack border 
  • Other: Papertrey Ink felt, Crate Paper stickers, white embossing powder, Papertrey Ink twine, Prima flower, Pink Paislee ticket, pearl
 ---------------------

Last, I stamped over some Pink Paislee text paper. The paper is embossed already, so I really like how the embossed look comes out in the stamping.  (The flowers and sentiment are from the anniversary set.)
I stitched 2 hearts together for dimension and stitched a felt rickrack border on the edge.
Miss You card:
  • Stamps: Botanical Silhouettes
  • Ink: Pure Poppy (red), Sweet Blush (pink), StazOn (black), Vintage Cream (around edges)
  • Paper: Pink Paislee Parisian paper
  • Dies: XL rickrack border
  • Other: white felt, houndstooth tape by Pink Paislee, sticker and chipboard by Crate Paper, pin, pearls, red cardstock, machine stitching
---------------------

Which card is your favorite? 
See Nichole's blog for the scoop on the 2010 Anniversary Stamp Set! 
Thanks for reading today,

Tuesday, April 19, 2011

dime store kit...

Did you know that in addition to Jenni Bowlin's monthly kits, she now has a Dime Store Kit each quarter (4 x's per year) featuring lots of her exclusive papers and things for more than 25% off? You also get directions to create 2 different projects that you can find here. This is a layout I made with this quarter's kit...
The 12x12" die cut paper was cut into four quarters, then I layered two of them together on the right (the blue and white) to house the title and journaling. I loved the blues and oranges in the kit, and just added a pop of red with felt and twine from my stash for a third color to make the layout a little more contrasting. The number 5 is cut out of one of the journaling cards with a Papertrey Ink die called By the Numbers.
I made another journaling card with a 5 cut out of it here from the blue/white journaling card. I added a JB chipboard button, JB circle sticker, a star punched out of the orange star paper and a blue star rub on - all from the kit also. The "remember" is cut from the text paper you see here in the photo.
Am loving my new We R Memory Keepers paper piercer and used it to poke a hole in the left of the card to tie on the twine. Sending a thank you to the WRMK guys I met at the last trade show!
My girls are always getting invited to parties by the kids at school, and store-bought cards are so expensive. I think I'm going to make more of these quick birthday cards to have in my stash! The journaling cards are the perfect size for this application.

I hope you'll check out the limited edition Dime Store kits!

Monday, April 18, 2011

sending you sunshine...

I forgot to share this card made with the new Grunge Me stamp set by Papertrey Ink! Instead of going manly with this set, I chose to add happy colors and show it's versatility. I stamped the large stamp in the center and cut out the middle for a "peek-a-boo" card.
I added the bird on the inside from the set and some Spanish moss peeking through the window. "Sending you sunshine" is from the Tag-its #3 set.
Here is what the inside looks like...
If you visit the main Papertrey Ink web page, you can see everything that is new for the month - stamps, dies, felt and paper. I have some new layouts to show you next for Pink Paislee and Jenni Bowlin! Hope you'll stop by again soon! xo

Saturday, April 16, 2011

all aboard...

Choo choo! I have two boyish cards for you today. I will admit, I'm not the best at making boy cards, but I had a go at this cute little set called Train Tracks.
I don't own any Copic markers to color in the train, so I stamped it onto Studio Calico patterned paper. (First, I used the Train Tracks dies to cut out the pieces.) The little track is made with two strips of cardstock and then machine stitched. I used the Ad Sense die to create some little smoke puffs.
I also stamped the presents onto various papers from my stash and cut them out.

The Grandpa card utilizes the My Hero, My Dad set and the Chevron Stripes.
I tried to keep it on the simple side with two punched stars inked with Versamark ink to add a subtle shading effect and a button backed with a paper cut out with the Ad Sense scalloped circle die again.
I just love how the team has utilized the Chevron Stripes set. So many neat ideas for all of the sets. I'm so impressed with how each of the ladies comes up with totally different designs using the exact same sets!

Friday, April 15, 2011

What's new at Papertrey Ink...

I'm back today with a few more things I made with this month's new stamp sets/dies at Papertrey Ink. I have so many to show you, so I may break it up and share more tomorrow! The first set I played with was called Chevron Stripes. When I looked at the stripes, they reminded me of decorating Easter eggs (can you tell I have Easter on my mind?). I decorated some cardstock eggs and attached them to candy-filled glassine bags.
The little tags are cut from the Tiny Tags dies and are stamped with Friendship Jar Spring Fillers (sentiments) and Tag-its #3 (flowers). I used the Papertrey Ink felt to make little flowers.
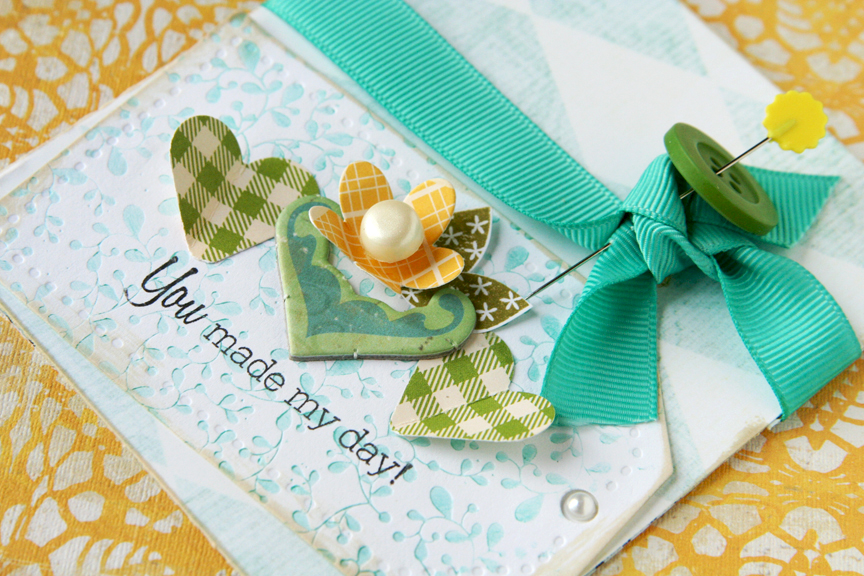
Next up is a card made with the new Ad Sense die and stamp set. I stamped the larger stamp onto the yellow patterned paper and then cut it in half to create this cute banner. The sentiments are from Ad Sense also, paper and chipboard are by Crate Paper. I backed the paper with some Papertrey Ink felt.

I used Dark Chocolate ink for the sentiments and sanded the edges of the paper.
This one was also made with Ad Sense (sentiments). I made a chipboard card base and wrapped ribbon around it for a cozy, "get well" feel. I used Vintage Cream ink around the edges of the card.
This next one was also made with Ad Sense - here you can better see the shape (that I used on the banner for the Gratitude card). I decided to make a hanging basket full of hearts and use the Chevron Stripes to hang the basket.
The large sentiment is from the new set called Think Big Favorites #3. The 100% love saying is from Ad Sense. It was fun to mix and match some older papers from my stash!
The last card utilizes the Flower Fusion #3 set. I cut the flower in the center with the Flower Fusion #3 die and stamped the leaves, then cut them out. I will show you more on how I created this card in another post!
All supply lists can be found HERE in my Papertrey Ink gallery.
I better stop there for today, but I'll be back soon. Enjoy your day! xo